Cooler Framing rough-in
One of the jobs that I have wanted to undertake since the first summer I owned the boat has been to re-do the cooler. I hate the side loading factory installed cooler. The reason I hate it is because the insulation sucks, the deck access hatch allows heat to leak in like a seive. Whenever you run the engine it just melts your ice. The drain is WAY too small. The side opening door dumps all the cold air out every time you open it. And because of the small drain and the side opening door, you are forever running cooler water out onto the settee if the drain gets clogged. It's a dumb system and I have always hated it. The only SLIGHTLY redeeming quality is being able to get a beer from on deck, but I don't mind taking a short walk for a beer if it means I can keep a block of ice for more than 24 hours during the summer.
I have a number of references on other folks who have re-done their coolers by cutting out the old one and installing a top-loading cooler in its place. Most of these are from Triton owners who are a group of folks remarkably good at documenting what they do (dare I aspire to get there...) Here are some links:
http://www.triton381.com/projects/restoration/galleyconstruction2.htm - This is Tim Lackey's infamous triton381 site where I got the original inspiration for the cooler project. This guy is a superstar. You could spend days just browsing his websites.
http://www.dasein668.com/projects/winter0405/icebox - Another triton owner who redid his cooler and had very similar ideas to mine, particularly about installing a HUGE drain.
I had also run into another Alberger who keeps his boat at Fairwinds (I can't remember his name now) and he had undertaken this job. What he wound up doing was re-using the fiberglass liner from the original cooler as the liner for the new cooler, which was kind of neat, but I felt this would limit the size of the cooler too much so I decided to start over from scratch with my own framing.
With these items as inspiration, and since I was replacing the engine anyway, I boldly forged ahead with removing the old cooler and its framing. Here are some shots of the removal process. First, here is a shot of the cooler with exterior woodwork and framing removed, but still in place. You can see how thin the insulation was:
 This is the cooler laying on the ground next to the boat. The big hole in the top is where the side-loading hatch had been. You can see my old bronze propeller shaft with the coupling permanently frozen on in the near background. Boat is in the far background.
  Another shot of the cooler laying on the ground. You can see the boat in the background. The hole in the side of the cooler is where the deck top-loading hatch had been.
  This is the hole that was left behind by the cooler. Outboard you can see the 3 shelves that were poor storage space when the cooler was there. My plan was to turn this space into the new electrical locker. At the bottom of the cooler locker is where the hand bilge pump hose ran through. I re-routed this hose, which was a real bear, but it had to be done in order to build the new cooler.
  Another shot of the space left behind by the old cooler. In this one you can see how high the old bulkhead came. I would later cut this down to make room for the top loading access. Unfortunately (for me) I planned poorly and my first cut on this longitudinal bulkhead was too low which later necessitated building a whole new bulkhead, costing me some time...
 This is the deck hatch in the bridge deck after I had done some cleanup and prepped it for glassing.
  Another shot of the cleaned up deck access ready for glassing.
  I used a LOT of 1708 biax cloth filling in the deck access. It's solid glass , which is pretty burly. I thought about coring it and in hindsight I probably should have but I was young and dumb when I did this and thought I didn't need to core it. I didn't know how many laminations it would take...a LOT.
  After cutting down the original bulkhead too much, I had to make a new one. Here you can see the new inboard longitudinal bulkhead which defines the boundary between the cooler and the engine room. This is 4 or 5" above the level of the top of the ER. This makes a big difference in the amount of storage contained in the cooler. My criterion was that I wanted to have enough vertical clearance to open a smallish laptop between the top of the cooler (which would double as galley counter and navigation table) and the bridge deck. The clearance is 13" I think. I haven't measured it in a long time. Should double-check that. Basically I wanted the top of the cooler to be as high as possible without compromising its usefulness as a navigation table and counter space. So I had to skate the line between capacity and usefulness.
 This is another view of the empty space with version #1 of the electrical panel installed and the new longitudinal bulkhead.
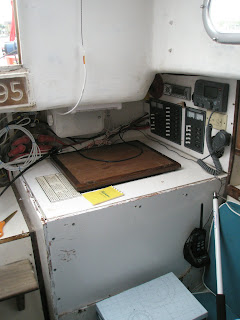
 This shows the electrical mains fuses, the handheld VHF temporary location (with its charger) and one of the stereo speakers. You can see the top of the cooler is installed here.
 Here's another shot of the cooler where you can see the transverse bulkhead and the top are installed if you look closely at the lower right you can see the locking lap joint that I cut into these two pieces to lock them in place, which is a nice feature, but took a lot of test fits to get right.
 Here yo ucan see the whole cooler installed, with the old side loading hatch temporarily installed as a top hatch. At this stage, I would call the cooler framing complete. I have not gotten around to actually installing the insulation, waterproofing it, and installing the drain. That will have to come later.
 Here is a view of the inside of the cooler where you can see one of the vertical cleats that the inboard longitudinal bulkhead is screwed into. We use the cooler in this capacity as a food storage location but obviously not as an actual icebox.
 This is the forward, inboard corner of the cooler, where the drain will eventually be located. Note the goslings and ginger beer. Good times had at the NOOD!
 I still have to actually build the insulation and install the drain. It's a work in progress more as it progresses!
I have a number of references on other folks who have re-done their coolers by cutting out the old one and installing a top-loading cooler in its place. Most of these are from Triton owners who are a group of folks remarkably good at documenting what they do (dare I aspire to get there...) Here are some links:
http://www.triton381.com/projects/restoration/galleyconstruction2.htm - This is Tim Lackey's infamous triton381 site where I got the original inspiration for the cooler project. This guy is a superstar. You could spend days just browsing his websites.
http://www.dasein668.com/projects/winter0405/icebox - Another triton owner who redid his cooler and had very similar ideas to mine, particularly about installing a HUGE drain.
I had also run into another Alberger who keeps his boat at Fairwinds (I can't remember his name now) and he had undertaken this job. What he wound up doing was re-using the fiberglass liner from the original cooler as the liner for the new cooler, which was kind of neat, but I felt this would limit the size of the cooler too much so I decided to start over from scratch with my own framing.
With these items as inspiration, and since I was replacing the engine anyway, I boldly forged ahead with removing the old cooler and its framing. Here are some shots of the removal process. First, here is a shot of the cooler with exterior woodwork and framing removed, but still in place. You can see how thin the insulation was:
 This is the cooler laying on the ground next to the boat. The big hole in the top is where the side-loading hatch had been. You can see my old bronze propeller shaft with the coupling permanently frozen on in the near background. Boat is in the far background.
  Another shot of the cooler laying on the ground. You can see the boat in the background. The hole in the side of the cooler is where the deck top-loading hatch had been.
  This is the hole that was left behind by the cooler. Outboard you can see the 3 shelves that were poor storage space when the cooler was there. My plan was to turn this space into the new electrical locker. At the bottom of the cooler locker is where the hand bilge pump hose ran through. I re-routed this hose, which was a real bear, but it had to be done in order to build the new cooler.
  Another shot of the space left behind by the old cooler. In this one you can see how high the old bulkhead came. I would later cut this down to make room for the top loading access. Unfortunately (for me) I planned poorly and my first cut on this longitudinal bulkhead was too low which later necessitated building a whole new bulkhead, costing me some time...
 This is the deck hatch in the bridge deck after I had done some cleanup and prepped it for glassing.
  Another shot of the cleaned up deck access ready for glassing.
  I used a LOT of 1708 biax cloth filling in the deck access. It's solid glass , which is pretty burly. I thought about coring it and in hindsight I probably should have but I was young and dumb when I did this and thought I didn't need to core it. I didn't know how many laminations it would take...a LOT.
  After cutting down the original bulkhead too much, I had to make a new one. Here you can see the new inboard longitudinal bulkhead which defines the boundary between the cooler and the engine room. This is 4 or 5" above the level of the top of the ER. This makes a big difference in the amount of storage contained in the cooler. My criterion was that I wanted to have enough vertical clearance to open a smallish laptop between the top of the cooler (which would double as galley counter and navigation table) and the bridge deck. The clearance is 13" I think. I haven't measured it in a long time. Should double-check that. Basically I wanted the top of the cooler to be as high as possible without compromising its usefulness as a navigation table and counter space. So I had to skate the line between capacity and usefulness.
 This is another view of the empty space with version #1 of the electrical panel installed and the new longitudinal bulkhead.
 This shows the electrical mains fuses, the handheld VHF temporary location (with its charger) and one of the stereo speakers. You can see the top of the cooler is installed here.
 Here's another shot of the cooler where you can see the transverse bulkhead and the top are installed if you look closely at the lower right you can see the locking lap joint that I cut into these two pieces to lock them in place, which is a nice feature, but took a lot of test fits to get right.
 Here yo ucan see the whole cooler installed, with the old side loading hatch temporarily installed as a top hatch. At this stage, I would call the cooler framing complete. I have not gotten around to actually installing the insulation, waterproofing it, and installing the drain. That will have to come later.
 Here is a view of the inside of the cooler where you can see one of the vertical cleats that the inboard longitudinal bulkhead is screwed into. We use the cooler in this capacity as a food storage location but obviously not as an actual icebox.
 This is the forward, inboard corner of the cooler, where the drain will eventually be located. Note the goslings and ginger beer. Good times had at the NOOD!
 I still have to actually build the insulation and install the drain. It's a work in progress more as it progresses!
posted by J Bergquist at 2:52 PM
![]()
0 Comments:
Post a Comment
<< Home